The minimum structure of the assignment is for you to display a form on the web page that requires visitors to “log in” by supplying a user name and a password. If you have time to do more, you can turn the “log in” form into a “register” form that uses various additional form elements to supply additional information besides a user name and password.
A second requirement is to use your CSS skills to style the form so that looks good and is well positioned on the page.
I am providing you with the following PHP code that you are to add to your web page to control the content based on whether the form has been submitted to it or not. (This concept will be covered in class.)
Copy and paste the above code into your index.xhtml file just before the first paragraph (p) element in the #content div. It’s very important that the second to last line (EOD;) starts with the 'E' in the leftmost character position of the line because of the way PHP implements the else echo <<<EOD statment three lines above it.
The form element is already in the PHP code: all you need to do is to add the code for the elements inside the form. The first part of the code generates a table that will show the name and value of each item of form data when the form is submitted.
That is, when you insert this code into your web page, the #content div will start with either a form or a table, depending on whether the form has been submitted yet or not. Seeing the page in action in class should make this mechanism a bit clearer.
Forms are covered in Chapter 9 of the textbook, so consult that if any of the following material is not clear. Here are the elements and their attributes that you will need to add to the form to implement the login feature:
- fieldset
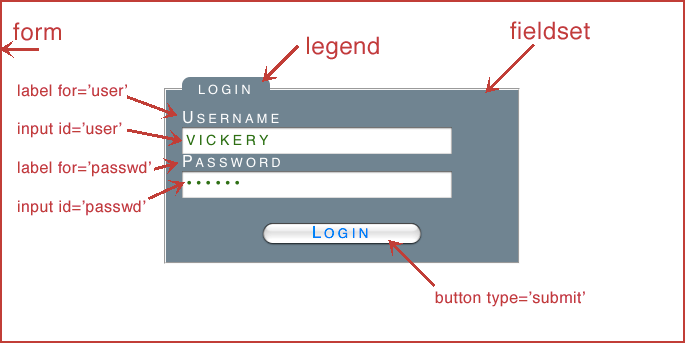
- All the interactive elements in a form must be contained inside some other element, such as a p or div in oder to pass XHTML validatation. The fieldset element is designed for just this purpose, so use it for this assignment so you can become familiar with it. It can be styled just like any other XHTML element, but it is unique in that it has a solid border by default. See the next element.
- legend
- The legend element is specifically designed for use with fieldsets. (In fact, it should arguably have been made an optional attribute of the fieldset element instead of a separate element in its own right. The legend will appear in the middle of the border of its fieldset. Again, all the CSS style properties can be used to make this element look any way you want.
- input type="text"
-
Use this element for the box the user is to type a user name or email address into. In addtion to the
type attribute, you must supply a name
attribute for identifying this piece of form data, such as name="user". The
value of the name attribute can be pretty much anything you want provided
it doesn’t contain any spaces. But make it meaningful. ("text" would be legal, but not meaningful, for example).
You will also need to provide an id for this element for use with its label. (See next item.)
- label
-
The label element is used to associate some text with an
input element. If the user clicks on a label, it’s the same as if the user
clicked on the corresponding element. Using labels in forms is essential for
radio buttons and checkboxes, which can be hard to “hit” with a mouse because they are normally quite small;
they also make text an password inputs easier to use.
To associate a label with an input element, you have to use the for attribute in the label, and the value of the for attribute has to match the value of the id attribute of the corresponding input element.
You will probably have an easier time using CSS to manage the layout of your form if you put the labels before their corresponding input elements.
- input type="password"
-
This works just like an input type="text" element, including everything
mentioned above about the name attribute and providing a matching
label. The difference is that characters typed into
a input type="password" element are echoed as asterisks or bullets.
Be sure the name attribute for the password is both meaningful and different from the name attribute for the user field.
- button type="submit"
- By adding the type="submit" attribute to a button the browser will submit the form data to the action page when the user clicks on it. Unlike the input element, this is not a self-closing tag: the content can be anything you like, typically either some text or an image of a fancy button that you created in Photoshop.
This screenshot of a form might help you follow the above description (right-click to view larger size):

The optional version of the form would use multiple text inputs for name, address, etc., and could use checkboxes and/or radio buttons so the user could express preferences, past experience, etc. Be creative!