-
Site preparation:
Duplicate your stylesheet for Assignment 4 and rename the copy, assignment_05.css. Update the sytlesheet link in index.xhtml to use the new stylesheet. You do not need to update the contents of the web page for this assignment.
-
Create a linear gradient background for the h1 element.
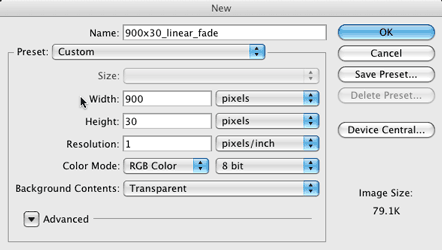
Create a Photoshop document 900 pixels wide and 30 pixels high; be sure it has a transparent background. This image will be tiled vertically, so the actual hieght does not matter; as mentioned in class, it could be as little as 1px tall.

Note the choice for the Resolution setting in the above screenshot: as pointed out in class, that parameter is irrelevant for web images. Only the intrinsic resolution matters. (When printing, however, the value of the resolution can be very important.)
Also note the document name in the screenshot. You can always pick a different name when you save the file, but you set the value here if you want to. When you pick a name for an image file, try to include information that describes the image rather than what its intended use is. For example, the name, “H1_Background,” becomes confusing if you decide later either that you want to use this image for something else or if you decide to use a different image for the H1 background.
Experiment with the gradient tool as much as you like. In Photoshop you can always undo an operation by typing Control-Z. (Actually, you might want to edit Photoshop’s keyboard shortcuts to make Control-Z be “step backwards” instead of “Undo/Redo.” You get to the keyboard shortcut editor from near the bottom of the Edit menu.)
 toolbar icon
When you are ready, delete any experimental gradients you have made. (You can either select everything and press
the Delete key, or start a new document if that’s easier.) Type 'D' to get the default black and white foreground
and background colors,
then click on the black square in the toolbar icon to bring up the color picker for the foreground color. Pick a color for
the H1 background image that will contrast with both the color of the H1 text and the background of the web page.
Select the Gradient tool from the toolbar, and select the linear gradient with transparency from the option bar that appears near the top of the Photoshop window. With a red color as the foreground, the option bar would look something like this:
 The blue circle shows which of the five gradient-style
buttons is pressed.
Start your gradient inside the image, about 300 pixels from the left edge, and drag it out to a point, still inside the image, about 200 pixels to the left of the right edge. This will make the left side of the image solid (so the H1 text will show up against it) and ending far enough inside that there should be no visible boundary where the gradient ends.
Save the image in your site’s images directory twice: first as a Photoshop document (it will have a .psd extension), and then using the menu item as a PNG-24 file with transparency. You can experiment with other image file formats, but this is the only format that will work correctly for this assignment.
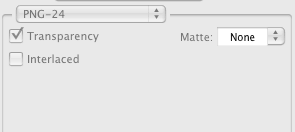
 PNG-24 Settings
When you save your file, it is important to keep the background transparent. The “Save for Web & Devices”
dialog box has a “Matte” option that must be set to “None,” as in this screenshot, to prevent having
a solid color added to the image to replace the transparent pixels.
Project Requirement:
Save all image files in your images directory twice, once as a Photoshop document (so I can look at it), and once as an image file to use on your web page.
Edit the stylesheet to use this image file as the background image for the H1 on your web page. Be sure to set the repeat property to repeat-y so the background fills the entire height of the H1 and does not appear more than once horizontally. Add padding to the H1 to make it look “right.” For this step, no background color has been specified for the H1, so it should be the default value, transparent, and the background color of the page’s body (black was the last value specified) should be the color that your gradient blends with. Change the background color of the body to a different dark color (such as #333), and verify that the H1 background gradient now blends into that color.
-
Create a linear gradient background for the h2 elements.
This step is the same as the previous step, except: you are to create a linear gradient that goes from top to bottom instead of from left to right (make the image 100px high and 20px wide); use CSS to make the background color of the H2 elements different from the background color of the web page, and verify that, again, the image fades into whatever background color you use as the gradient approaches the bottom of the H2 elements.
Optional: edit the gradient so that it fades to transparency long the top edge as well as going towards the bottom.
-
Create a fixed-position background element for the body of the web page.
Create an image that is 64px square and transparent. Create a radial gradiant (the button next to the one for linear gradients in the gradient option bar) that starts in the center and extends three-quarters of the way to the outside edges. (You can change the gradient later if you don’t like how this one looks.) Use this image to create a single horizontal row across the page, fixed at a position 250px down from the top. Scroll the page and observe that the row does not move. Use Photoshop to adjust the images to give a pleasing effect.